


Introduction
NPM (Node Package Manager) is a powerful and widely used package manager for Node.js and the JavaScript ecosystem. It serves as a centralized repository for open-source JavaScript code, allowing developers to share, reuse, and manage code easily. NPM plays a crucial role in the JavaScript community by enabling developers to leverage existing solutions, thereby accelerating the development process and fostering collaboration within the community.
Creating custom packages for code reuse and sharing is an essential practice in software development, particularly in large-scale projects and collaborative environments. Custom packages, when properly designed and implemented, offer several key benefits that significantly impact development efficiency, code maintainability, and overall productivity.
Prerequisites
Knowledge of JavaScript and Node.js
Basic understanding of npm and package.json
A npm account. Do not have one? Create here.
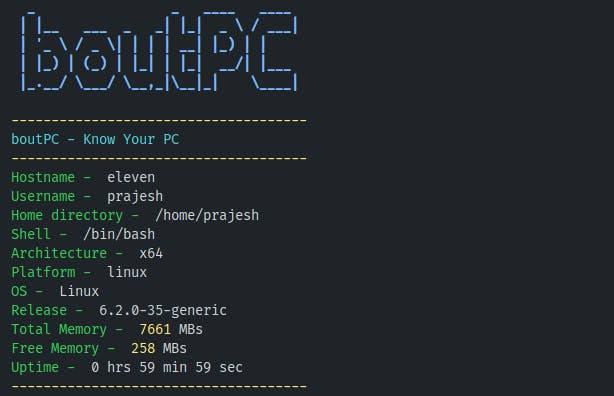
In this tutorial, we are going to make a npm package that displays your system’s basic information.
Step 1: Setting Up Your Project
- Create a project directory
mkdir boutpc
cd boutpc
- Initializing a new npm project with
npm init
npm init -y
- Installing dependencies
npm i figlet chalk@4.1.2
- Installing dev dependencies
npm i -D nodemon
- Configuring your package details in
package.json
{
  "name": "boutpc",
  "version": "1.0.0",
  "description": "a simple cli tool to display your system's information",
  "main": "index.js",
  "scripts": {
    "start": "node .",
    "dev": "nodemon .",
    "test": "nodemon tests/index.js"
  },
  "bin": "./index.js",
  "repository": {
    "type": "git",
    "url": "git+https://github.com/prajeshElEvEn/boutpc.git"
  },
  "keywords": [
    "os",
    "system"
  ],
  "author": "eleven",
  "license": "ISC",
  "bugs": {
    "url": "<https://github.com/prajeshElEvEn/boutpc/issues>"
  },
  "homepage": "<https://github.com/prajeshElEvEn/boutpc#readme>",
  "dependencies": {
    "chalk": "^4.1.2",
    "figlet": "^1.7.0"
  },
  "devDependencies": {
    "nodemon": "^3.0.1"
  }
}
Step 2: Writing Your Package
- Create an
index.jsfile in the project root and write the following lines of code
// Import necessary modules
const os = require("os");
const figlet = require("figlet");
const chalk = require("chalk");

// Function to display system information
const boutpc = () => {
  // Display the title in a stylized font
  console.log(
    chalk.blueBright.bold(
      figlet.textSync("boutPC", { horizontalLayout: "default" })
    )
  );

  // Display the section title
  console.log(chalk.yellowBright("-------------------------------------"));
  console.log(chalk.cyanBright("boutPC - Know Your PC"));
  console.log(chalk.yellowBright("-------------------------------------"));

  // Display basic system information
  console.log(chalk.green("Hostname - "), os.hostname());
  console.log(chalk.green("Username - "), os.userInfo().username);
  console.log(chalk.green("Home directory - "), os.userInfo().homedir);
  console.log(chalk.green("Shell - "), os.userInfo().shell);
  console.log(chalk.green("Architecture - "), os.arch());
  console.log(chalk.green("Platform - "), os.platform());
  console.log(chalk.green("OS - "), os.type());
  console.log(chalk.green("Release - "), os.release());

  // Display memory information
  let tmem = Math.floor(os.totalmem() / (1024 * 1024));
  console.log(chalk.green("Total Memory - "), tmem, "MBs");
  let fmem = Math.floor(os.freemem() / (1024 * 1024));
  console.log(chalk.green("Free Memory - "), fmem, "MBs");

  // Format system uptime and display
  let uptime = os.uptime();
  let uptimeString = formatUptime(uptime);
  console.log(chalk.green("Uptime - "), uptimeString);

  // Closing separator
  console.log(chalk.yellowBright("-------------------------------------"));
};

// Function to format the system uptime
const formatUptime = (uptime) => {
  let seconds = Math.floor(uptime % 60);
  let minutes = Math.floor((uptime % 3600) / 60);
  let hours = Math.floor(uptime / 3600);

  return hours + " hrs " + minutes + " min " + seconds + " sec";
};

// Export the boutpc function
module.exports = boutpc;
Step 3: Testing Your Package
- Create a new file in your root
/tests/index.js
const boutpc = require("../index");

boutpc();
- Run the command on your terminal
npm run test
Step 4: Publishing Your Package
Create a
README.mdfile for you package showcasing it’s features, installation and usage with examples.Running
npm loginto log in to your npm account from the command line
npm login
- Running
npm publishto publish your package to the npm registry
npm publish
Conclusion
In summary, creating your first npm package is a valuable step in contributing to the developer community and promoting code reuse. By following the steps outlined in this guide, you can effectively share your code with others, foster collaboration, and showcase your expertise. Remember to maintain best practices, such as versioning, documentation, and regular updates, to ensure the longevity and relevance of your package.
Embrace the opportunities offered by the npm ecosystem, engage with the open-source community, and continue to refine your skills. Your npm package can serve as a valuable resource for fellow developers and contribute to the advancement of JavaScript development. Happy coding and happy sharing!